Crowd Sourcing: Get Involved!
We need your help in advancing this project! Follow the instructions below to join the crowd sourcing effort:

|
Fungi with conspicuous spore-bearing structures are commonly
known as macrofungi (e.g., mushrooms, boletes, puffballs, club fungi,
morels, stink horns, truffles, and cup fungi). The Macrofungi Collection
Consortium (MaCC) is an NSF funded project that unites collections of
macrofungi (currently 38 participating institutions) to digitize
specimen information. This information documents the diversity
and distributions of macrofungi in North America since fungal specimens
were first deposited in U.S. fungaria in the 1800's.
Since its beginning, the MaCC project has made over 1.5
million records of macrofungi available online through mycoportal.org,
the project's data portal. Thousands of specimen label
images are found among these records, and large numbers of these have
not been completely transcribed. We need your help in
making data from these specimens fully available. In transcribing
data from fungal specimen labels, you are part of a larger effort
documenting fungal diversity in North America. If you'd like to
help in this effort, follow the directions below to start transcribing,
or follow the links here to start transcribing for the
New York Botanical Garden
(NY), the
Farlow Herbarium
(FH; Harvard), or the
University of Michigan
(MICH).
Image credits: Mushroom images on this page were provided by R. Lebeuf.
|
The image to the right is a label from a fungal specimen collected by
Calvin Henry Kauffman, an early American mycologist. Fungal specimen labels such
as this contain a few basic types of data, including the name of the fungal species
(i.e., Cortinarius alboviolaceus), the collection locality (i.e., USA, Michigan,
Ann Arbor, Cascade Glen) and date (i.e., September 18th, 1907), the collector/s (i.e.,
C.H. Kauffman), as well as notes (i.e., A beautiful form which might be called "forma pulcheripes”).
Other types of information about where the specimen was collected (e.g., the substrate
the fungus was growing on and/or the habitat in which the specimen was found) may also be included.
|

|

Field image: Cortinarius alboviolaceus fruiting bodies collected as a specimen.
|
In order to start transcribing, you will need to create a mycoportal.org login
(click here to create login). You will be assigned points
for each fungal specimen record that you transcribe, and you can track your points on the
Crowdsourcing Score Board
(follow the ‘Crowd Source: Score Board’ links from the navigation bar). The top scorers will be listed along
with statistics documenting their efforts as well as progress made collectively by ‘crowdsourcers’, such as
yourself, in completing datasets from particular institutions. You will need to be logged into the portal
whenever you are working on completing records. Once logged into the portal, you are ready to start transcribing. From the
Score Board,
click on the ‘Open Records’ to work on record sets from your preferred institution or follow the links above to work on
sets from specific institutions (e.g., FH, MICH, or NY).
|
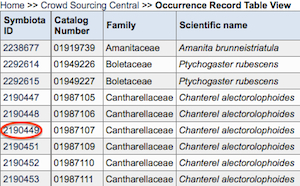
Once selecting a record set to work on, you will see a series of
records from a given institution that need to be completed. In order to start transcribing a label to complete the specimen record,
click on the corresponding 'Symbiota ID' (e.g., the ID '2190449' circled in red in the image to the right for a specimen
record of Chanterel alectorolophoides, an older name for Cantharellus cibarius). Clicking on this ID link will take you
to an editing page where you can enter data as you transcribe the specimen label from an image of the label that will appear on the
editing page to the upper right (see image below).
|
|
Don't forget to click on 'Save Edits' button (circled in red at the bottom of the
editing page in the image below) once you have finished transcribing the label for a particular specimen record (Note - transcribed data
entered and saved will not appear on mycoportal.org records until it has been approved by the corresponding institution's collection manager).
If the record is too difficult to transcribe, simply move on to the next record by clicking on the record navigation arrows (circled
in red at the top of the editing page in the image below). Detailed notes on transcribing, including how to zoom in on elements in the image
label, are provided below. Click on these links to learn more about the institutions making their data available for crowdsourcing:
|

|
Notes on transcribing specimen data from a label image:
- Position Label and Enlarge View: The label can be positioned in the 'Label Processing' image frame by
holding down the 'command' button, placing the cursor over the image, and holding and moving the cursor to place the label in the desired position.
To enlarge the label view, the image frame can be widened by clicking and dragging on the right border.
- Zoom on Label Elements: Zoom in on a label element by placing the cursor over the label image, holding down the 'Shift'
button, and holding and dragging the cursor up to enlarge the image or down to reduce it.
- Navigating Between Images: There may be several images associated with a single record, the exact number will be displayed to the bottom right
of the image frame (e.g., image 1 of 2=>>). Click on the arrow symbols to navigate through the images until the label image is reached. Taking
a quick browse through the images may reveal additional information (e.g., annotations, note sheets, etc.); however, it is not necessary to transcribe
large segments of notes (e.g., a page giving a complete technical description of the specimen).
- Image Resolution: If a label element is not clearly discernible, try clicking on the 'High Res.' radio button to the upper right of the image
frame before zooming in on the element.
- Optical Character Recognition (OCR): An OCR attempt can be made on the label by selecting the desired 'OCR' radio buttons (with or without result
analysis) and then clicking on the 'OCR Image' button to the lower left of the image frame (Note - OCR results often take more time to review and
cut/paste into the appropriate data fields than it takes to simply keystroke the data into the appropriate data fields on the editing page).
- Data Field Information: Click on the small green question mark next to the data field heading to link on
information about that field.
- Collector Field: Enter the name of the person who collected the specimen. This information is often indicated by label elements such as 'Collected by',
'Coll.', or 'Leg.' (Latin - legit: he or she collected).
- Associated Collectors Field: If more than one collector is indicated, enter the names of any additional collectors into this field.
- Number Field: This number is specific to the specimen collector, and is often called the 'collector's number'. At times there will be
a collector's number as well as a field number (e.g., one that is specific to a project). If this is the case, enter the collector
number into this field and indicate the addition field number in the 'Notes' field.
- Date Field: Enter the date in the numeric form (year-month-day, e.g., 1912-07-17 for July 7th, 1912). Enter zeros for date elements that are missing
(e.g., 1912-07-00 for July 1912). If the date is represented as a range, enter the first date of the range into the data field and indicate the
complete range in the 'Verbatim Date' field (see the example above).
- Verbatim Date Field: Enter the date ranges or seasonal dates (e.g., Fall 1912) as they appear on the label.
- Scientific Name Field: This field should already be populated with the scientific name of the specimen (e.g., Cortinarius alboviolaceus) and
should not be changed. If the scientific name does not appear in this field, the name given on the label can be entered.
- Country Field: Enter the country cited on the label here (typically 'USA').
- State/Province Field: Enter the state or province cited on the label here. Spell the state or province in full even if an abbreviation is given on the label.
- County Field: Enter the county for the locality cited on the label. This field can be left blank if the county is not cited or the county can be entered if it is
known or can be determined.
- Locality Field: Enter the locality information cited on the label, moving from the most inclusive area to the least inclusive (e.g., Yellowstone National Park,
Mammoth Hot Springs, off trail in the upper terrace area).
- Latitude and Longitude Fields: Enter only decimal latitude/longitude (e.g., 44.2794/-73.98028) values into these fields. Non-decimal values can be
entered into the 'Verbatim Coordinates' field (see below). Decimal latitude/longitude values can be determined using one of the two georeferencing tools
provided on the editing page (see below); however, entering georeference data is not required when transcribing labels.
- Georeference Tools: The 'GEOLocate tool' attempts to determine the coordinates based on the geographic data entered for the record (e.g., a city given in the
locality for a particular state). To use this tool click on the whirlwind icon (circled in red toward the middle of the editing page in the image above) after entering the geographic
data. If coordinates can be determined from the geographic data, click on the 'Save To Your Application' button at the bottom of the GEOLocate page to carry the coordinates to the record.
Note that a value will also appear in the 'Uncertainty' field. This value represents a radius (in meters) that encompasses the locality (e.g., 2015 m or ~2 km encircling the village of Lake
Placid in the example above), a circumscribed area within which the collection occurred but cannot be exactly determined. The 'Google Maps tool' determines the coordinates based on a point
that the transcriber places on the Google map (first navigating to the locality, then click on the map to place the point, then click on the 'Submit Coordinates' button toward
the top of the Google Maps page to carry the coordinates to the record). The Google Maps tool can be accessed by clicking on the globe icon to the left of the GEOLocate
tool whirlwind icon mentioned above.
- Verbatim Coordinates Field: Enter any coordinate information (e.g., latitude/longitude, UTMs) cited on the label. Latitude/Longitude data entered here (e.g., 44 35' 15" N 73 10' 23" W)
can be converted to decimal values by first entering the data and then clicking on the double arrow ('<<') symbol to the left of the field to transfer the decimal form into the 'Latitude'
and 'Longitude' fields.
- Elevation Fields: Elevation data can be entered in meters, either as one value (enter into the left 'Elevation in Meters' field) or an elevation range (using both
fields). If the elevation data on the label is given in feet, then that data should be entered into the 'Verbatim Elevation' field (e.g., 1500 ft.). Verbatim elevation data can be converted
to the metric value by clicking on the double arrow ('<<') symbol to the left of this field to transfer the metric form into the 'Elevation' field.
- Habitat Field: Enter any information related to the habitat (within which the specimen was found) that can be determined from the label (e.g., 'grassy field in
Oak savanna').
- Substrate Field: Enter any information related to the substrate (on which the specimen was growing) that can be determined from the label (e.g., 'growing from a
rotting oak log' or 'on ground').
- Notes Field: Notes on the specimen (or any other information that does not fit in the fields mentioned above) appearing on the label can be entered into this field.
- Saving the Specimen Record Edits: Click on the 'Save Edits' button (circled in red at the bottom of the editing page in the image above) once you have finished transcribing
the label for a particular specimen record.
- Status Auto-Set: The status will automatically be set to 'Pending Review' and should not be changed.
- Navigating Between Records: Once the label for a given specimen record has been completely transcribed, save the record edits and move on to the next record by clicking on the
record navigation arrows (circled in red at the top of the editing page in the image above). If for some reason the label is difficult to transcribe (e.g., unintelligible writing),
skip the problematic record and move on to the next one.
- Accessing Saved Records: To access records already saved but not yet approved, click on 'view records' for 'Pending points' under ’Current User’s Status' on the crowdsourcing
Score Board. Edits can then be made by clicking on the small pencil icon in the
'Edit' column corresponding to the record in need of editing. Correct errors or add missing data and then save record edits as instructed above. After a record has been reviewed and approved,
the record will no longer be able for editing.
|
|

